A salt dough decoration is one of the most charming, affordable, and creative crafts you can make at home. You only need a few basic pantry ingredients to start crafting beautiful pieces. People of all ages love this simple activity.
Making these items brings back great childhood memories for many of us. You can make holiday gifts, personalized keepsakes, or just spend a rainy afternoon creating something fun.
Here’s the thing. You do not need to be a professional artist to get amazing results. You just need a little patience and the right technique.
What Is Salt Dough?
Salt dough is a modeling material made from common household ingredients. It acts a lot like clay, but it is completely non-toxic and safe for kids.
Once you mix the dough, you can mold it into any shape you want. After shaping, the drying process hardens it permanently.
The Magic of Simple Ingredients
You probably already have everything you need in your kitchen. The classic mixture requires nothing more than flour, salt, and water.
When mixed in the correct ratio, these simple ingredients create a pliable, smooth dough. The salt acts as a preservative to keep the finished craft from spoiling over time.
A Brief History of Salt Dough Art
People have been mixing flour and water to make art for centuries. It is not just a modern weekend craft project.
Historically, cultures around the world used dough to create temporary sculptures for festivals and religious ceremonies.
From Ancient Times to Modern Homes
What’s interesting is that the tradition of baking decorative dough dates back to ancient Egypt and Greece. They would craft small figures to honor their deities.
Later, in European countries like Germany, families began creating lasting dough ornaments to decorate winter holiday trees. This tradition eventually evolved into the modern craft we know and love today.
Getting Started with Your First Salt Dough Decoration
Starting your first salt dough decoration project is exciting. You just need a clean workspace and a few basic supplies.
Clear off your kitchen counter or a large table. Grab a large mixing bowl, a wooden spoon, and your ingredients.
The Perfect Flour and Salt Recipe
To get the best results, you need a reliable flour and salt recipe. The standard ratio is two parts all-purpose flour to one part table salt, mixed with up to one part warm water.
For example, mix two cups of flour with one cup of fine salt. Slowly add up to one cup of warm water while stirring.
Mixing Your Dough Just Right
Pour the water in very slowly. You might not need the entire cup of water, depending on the humidity in your house.
Mix it with a spoon until it forms a shaggy ball. Then, dump it onto the counter and knead it with your hands for about ten minutes. Kneading is the secret to a smooth, crack-free salt dough decoration.
Essential Tools for Shaping and Sculpting
You do not need fancy sculpting tools to make a great salt dough decoration. A standard rolling pin works perfectly for flattening the dough.
Cookie cutters are great for creating uniform shapes like stars, hearts, or trees. A simple plastic straw is the best tool for poking a clean hole at the top if you want to hang your pieces later.
Baking Your Creations to Perfection
Baking is a critical step in making a salt dough decoration. You want to dry the dough out completely without burning it.
Some people prefer to air dry their pieces, but that can take several days. Using an oven speeds up the process significantly.
Temperature and Timing Tips
Set your oven to a very low temperature, usually around 200 degrees Fahrenheit (or 90 degrees Celsius). Place your shaped pieces on a baking sheet lined with parchment paper.
Bake them for two to three hours. Flip them halfway through the baking time so both sides dry evenly. Thicker pieces will require more time in the oven.
Preventing Cracks and Bubbles
To be honest, dealing with cracks can be frustrating. Cracks usually happen when the oven is too hot or the dough holds too much moisture.
Keeping the oven temperature low is your best defense against bubbling. If you notice the edges browning too quickly, lower the heat or cover the pieces loosely with aluminum foil.
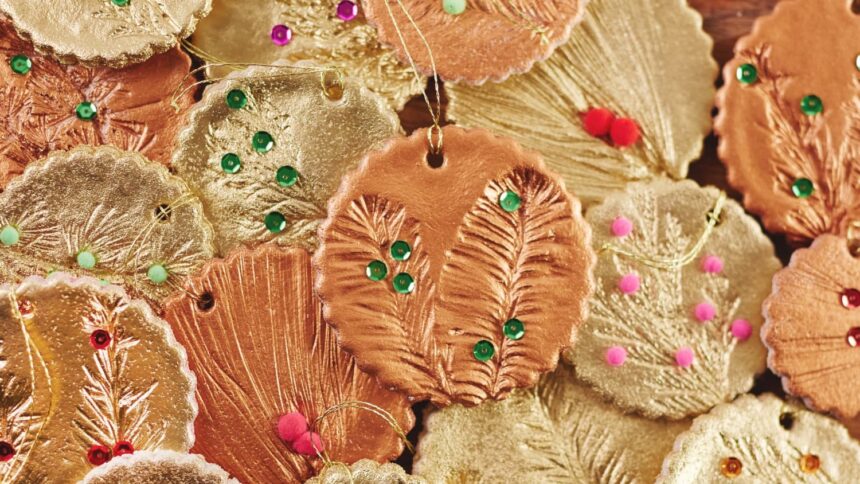
Painting and Sealing Your Ornaments
Once your salt dough decoration cools completely, the real fun begins. Adding color brings your creation to life.
Make sure the dough is completely hard and cool to the touch before you bring out the brushes. Any leftover moisture trapped inside will ruin the paint job.
Choosing the Best Paints
Acrylic paint is the absolute best choice for a salt dough decoration. It covers the dough smoothly, dries quickly, and offers bright, vibrant colors.
You can use standard craft acrylics found at any local hobby store. Watercolors do not work well because the extra water can soften the baked dough.
Applying a Protective Sealant
Sealing your craft is mandatory if you want it to last for years. A good sealant protects the piece from moisture and humidity in the air.
You can use a spray-on clear acrylic sealer or brush on a layer of Mod Podge. Apply at least two coats, allowing the sealant to dry completely between layers.
Fun Ideas for Every Season
You can make a unique salt dough decoration for any time of the year. The possibilities are truly endless once you master the basic flour and salt recipe.
Springtime calls for flowers and butterflies, while autumn is perfect for shaping little pumpkins and leaves.
Holiday Ornaments and Gifts
Winter holidays are the most popular time for this craft. Families love making custom ornaments to give as gifts to teachers, friends, and relatives.
You can stamp names or dates into the wet dough before baking. A personalized salt dough decoration makes a highly thoughtful and inexpensive gift.
Handprint Keepsakes for Kids
Capturing a child’s handprint in dough is a wonderful way to freeze time. Roll out a thick circle of dough and press the child’s hand firmly into the center.
After baking and painting, you have a beautiful keepsake. Many parents make one of these every year to track how much their children have grown.
Continue reading: The Ultimate Guide to the Gastronomy of France